Permalinks on outlines are now rendered for every headline in an outline.
This was a user request, and I thought it made sense so I set it up this way. Very easy change, low probability of breakage.
You can see the change on any one of my this.how documents. Here's a screen shot.
Major change in 1.8.16 is that LO2 is now its own reader app.
This makes it possible for people to become familiar with LO2 before they sign up.
Also cleaned up and reorganized the Docs menu.
Change notes are here.
A new version of Little Outliner is coming, 1.8.5.
The change notes are here.
I'll update this post when it's ready.
Welcome to version 1.8.x of Little Outliner.
This is a rundown of the new features in this release.
This is a short doc that shows how to create and edit a "status center" page like scripting.com/status.
- First, you create and edit the outline using Little Outliner. Log on to the site. Create a new outline called myStatus.opml.
- Add a few top level headlines, and then a few second-level headlines underneath them. It doesn't have to be much. If you want, you can import the OPML from my outline, using the Import OPML command in the File menu. That will give your status center a lot of starting material.
- When you're ready to view it as a status center, make your outline public, by choosing Get public link from the File menu. Click OK to confirm, and then OK to dismiss the dialog that appears with the URL.
- Then choose Status Center from the (new) Build sub-menu of the Outliner menu. It will open a new page with your status center page, ready to be shared with other people. That's it. You can go back and edit the outline and it'll automatically update the status center.
Embellishments
You probably want to change the title at the top of the page. For that, choose Set title & description in the File menu. A dialog appears. In that dialog, the "long" title appears at the top of the page, and the short title appears in the title of the HTML.
Note that unlike changes to the outline itself, which are automatic and real-time, these changes require that you re-build the status center outline.
Are you a coder?
If so, here's a view-source link for the template for status centers. It's not open source, because it would take a lot of work to make it open source, and I don't have time. But the code is there as sample code. You are free to use any of it.
The idea is very simple. It takes an OPML file and converts it to JSON, and then passes it through an outline renderer. You can probably get a lot done just by hacking the CSS, but you're free to change any of it.
You can use any OPML editor
If you want to make your own OPML, there are a number of outliners out that there that generate it, for example OmniOutliner on the Mac, I'm told is very nice (my friend Brent Simmons is working on it these days).
You can if you must write the OPML by hand, but I don't recommend it. Sort of spoils the flow. 
However, if you use your own outliner, you have to modify the source (see above).
The modification is brain-dead simple. Just replace the URL of my outline with the URL of yours.
Questions
If you have question, post a comment below. Be sure to include the URL of your status center so we can see what you're talking about.
Listicle is the first app for Little Outliner. And for now it takes a little bit of manual glueing-together to get the app installed. I expect this will get smoother over time.
How to
- If you haven't already created a menubar, do so now. Create an outline called menubar.opml. Add a top-level headline called Scripts, and underneath it create a headline called Listicle.
- With the bar cursor on the Listicle headline, created above, click the suitcase icon in the left margin to edit the headline's attributes. Add an attribute called urlApp with the value http://listicle.io/dave/app.json.
- Pause, then pull down the menu. You should see a sub-menu under the Listicle item. The first item should be Build listicle and the second should open this page of docs.
To test it, create a new outline. You can put anything you like in the outline. Here's the outline I used for my demo. It can be a list of your favorite movies.
The outline must be public. To make it public, choose Get public link in the File menu.
When you're ready to try it out as a listicle, go to the Scripts menu, Listicle sub-menu, and choose Build Listicle. Confirm you want to build this outline. If it works it will open a new tab with the listicle in it.
Use the arrow keys to go back and forth, or if you're on a phone or tablet you can swipe left and right. There are left and right arrow icons at the top.
Updating the listicle
It couldn't be easier. When you edit the outline, the listicle automatically reflects the changes. It's live. (My favorite feature.) It means you can possibly use the listicle as a way of liveblogging. Something to consider.
Options for listicles
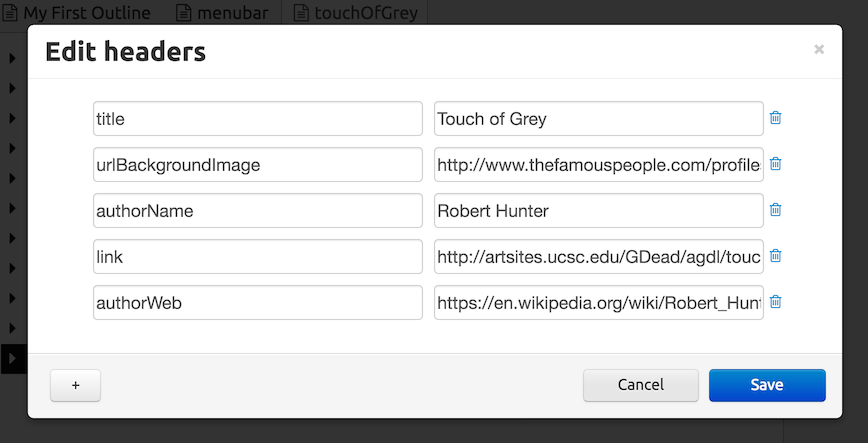
If you want to edit the options for the listicle, its title, background image, etc, choose Edit OPML head in the File menu. These are file-level attributes for the outline. That's where the listicle software looks for various settings. Here are the ones you're most likely to set.
- title, the title at the top of each page.
- link, the page the title points to.
- authorName, obviously the name of the author.
- authorWeb, the address of the author's website, the page that the author's name points to.
- urlBackgroundImage, the address of a JPEG, GIF or PNG image to use as the background for the listicle.
- opacityBackground determines the darkness the background of the text in the listicle. 0 is totally clear and 1 is black.
- itemLabel determines what it says in the permalink above the title of each page in the listicle. The default is Idea. You could change it to Epiphany or Theory as examples or whatever.
- urlParamName is the name of the parameter we put on the url after the ? to link to individual slides. If you change this you may break incoming links, but if you don't like the default of idea go ahead and party.
Here's a screen shot of the header attributes for the demo listicle.
If you have any questions or see any problems, post a note in a comment below.
This post describes new features in Little Outliner v1.65c. The first post about this feature was on Scripting News. You should read it before diving in here.
Verb set
The verb set is implemented in this JavaScript file. You should only call functions defined in this file if you want compatibility across versions of the app.
File verbs
A couple of users, coming from Fargo, were happy to see the Scripts menu appear in LO2, but were hoping to see the file verbs that were in Fargo. After a little thought I was able to create versions of the file verbs but instead of writing to Dropbox, they write to the storage system for LO2. The two systems work differently in small ways.
A file can be either public or private. All files that you write in LO2 from a script are public. Files that you read can be either private or public.
There's a new verb, file.getFileList, that gets a list of all the files you have on the server. It takes one param, a function that is called-back when the list is available. The list is an array of strings containing paths of files that can be passed to file.readWholeFile, for example.
file.getFileList (function (theList) {
dialog.alert ("There are " + theList.length + " files in the list.");
});
Menus are hierarchic
To make a command a hierarchic menu instead of a script, add an attribute flSubMenu with the value true.
Demo scripts
I've made the OPML file for my Scripts menu public.
Here's an instant outline version of the same file.
Questions? Post a comment below.
New in LO2 v1.63a.
A new + icon in the left margin creates a new headline in a calendar structure.
Here's a short video demo of the feature.
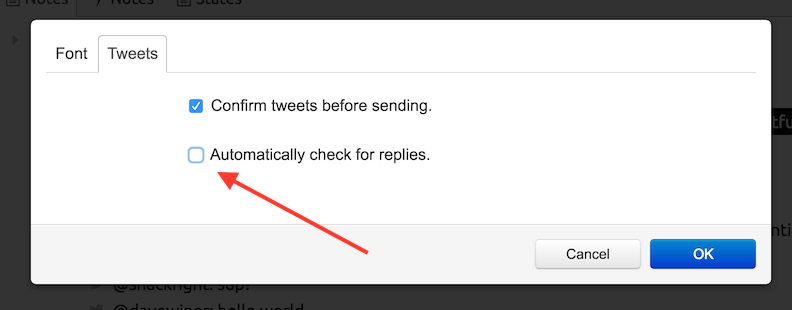
If you're tweeting from the outline, you can have LO2 automatically check, every three minutes, if there are replies to any of your tweets.
To turn it on, visit the Settings dialog in the System menu.
In the Tweets tab, there's a new checkbox. Click it and click OK.
That's it. Now every three minutes LO2 will ask Twitter for any replies and insert them beneath the tweet they are in response to.
Current replies are shown in green, i.e. if they were found the last time we looked. So they stand out a bit. The green is gone the next time we search.
It only checks the outline in the current tab and it only checks if the outline has tweets. You should put all your tweets in one outline. If you put them in more than one you will lose replies. If you don't care about replies, you can put them anywhere.
This feature is available in LO2 v1.61a.
Starting in v1.60, we can send tweets from inside LO2.
Here's how you do it.
Type some text into a headline.
You can see how long the text will be by watching the attribute list below the outline display. There's a new length readout that tells you how long your headline is. If you plan to tweet it, don't let that number over 140.
When you're ready to send the tweet, click on the Twitter icon in the left margin. You'll get a confirmation dialog, to be sure you didn't click the icon by accident. Click OK to send the tweet.
If you want to see the tweet, click the Twitter icon again. You can also get there by double-clicking on the headline as if to expand it. If it has no subs you'll be taken to the tweet on the Twitter website.
Adding a link to a tweet
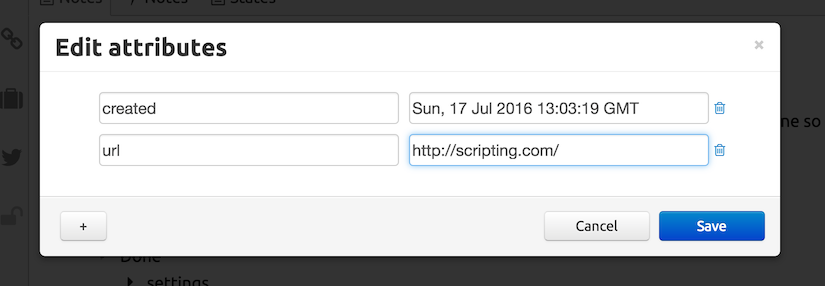
If a headline has a url attribute, it will be added to the end of the tweet before sending. Make sure there's an extra 25 characters for the link when you're editing the text of the tweet. If there isn't room you'll get an error dialog telling you how many characters there were.
To add the url attribute, click on the suitcase icon in the left margin. This opens the Edit Attributes dialog. Click the + button to add a row. In the left column of the newly-created row enter url, in the right column the url itself, and then click OK. Here's a screen shot that illustrates.
Suppose you're creating an outline that's meant to be used with another web app. You'll need a link to the OPML file for that. Here's how you get it.
- Make sure the outline you want to make public is in the current tab in LO2.
- Choose Get public link in the File menu. Confirm that you want to make it public.
- A dialog will appear with a link highlighted. This is not a link to the OPML file. It's a human-readable version of the outline that is kept in synch with the outline as you edit it. It's useful, but it's not what you want.
- Now that the outline is public, choose View OPML in the File menu.
- The OPML text will display. More important, the URL of the OPML file will be in the address bar of the browser. Copy it. That's it, you now have a public link to the OPML file.
- Caveat: Of course any changes you make to the outline will now be public.
- Also: Once an outline has been made public there's no way to make it private. You can however remove all the text from the file. Which is pretty much the same thing as deleting it.
Example: Here's a link to the OPML file for my current (public) todo list.
I want to see if I can use LO2 to edit a glossary for 1999.io.
Here's a glossary link: Little Outliner .
And here's another, which is a picture of the Mets mascot, the dorky..

Hot damn it worked!
Here's the link to the glossary OPML file.
How to
First I created a new outline called glossary.
Then I added two top level items as you can see in the OPML file linked to above.
I made the file public using Get Public Link in the File menu.
Choose View OPML again in the File menu.
Copy the URL in the address bar in the browser. That's the address of the OPML file.
In 1999.io open the Settings, go to the last panel Misc, paste the URL into the Glossary entry and click OK to save.
Reload 1999.io (this causes it to load the glossary).
Then when I entered quote Little Outliner quote it replaced it with the link, as it was supposed to and changed quote Mr Met quote to the image of the dapper Mr Met.
Interop is awesome!! 
If you have questions about using Little Outliner 2, please post them here. Be sure to say what you were doing, what happened, what you expected to happen. Screen shots often help.
Little Outliner is an easy to learn, entry-level outliner that runs in a web browser.
It's written in JavaScript. You must have JS turned on in the browser to be able to use it.
Getting started
To create outlines, go to littleoutliner.com, log on with your Twitter account.
A dialog appears asking for the title of your new outline. Click OK when ready.
An empty outline opens. Type. Press Return to start a new section. Tab and shift-tab to indent and outdent. Double-click to expand or collapse a headline and all its subs.
There is no charge to use Little Outliner. Use it to become familiar with outliners. For some people the features of Little Outliner will be exactly what they need.
The outlines are stored on my server, but you can get the standard OPML source text for them, so they can be moved to any compatible outliner.
What is an outliner?
It's an editor that works with hierarchic structures.
For a full explanation, check out the Outliner Howto.
What are outliners used for?
Notetaking.
Organizing projects.
Narrating your work.
Presentations.
Writing.
Design.
Programming.
Specifications.
Let's say you want to test LO2 with a different nodeStorage server.
Suppose the server is at http://storage.myserver.com:1999/.
In Little Outliner, open the JavaScript console, and enter the following:
switchServer ("http://storage.myserver.com:1999/")
The page should reload and you should get a screen saying to sign on to Twitter.
You should be prompted to create a new outline, if this is the first time you've used LO2 with this server.
From there, you can use LO2 as you would on the default server.
If you want to switch back, enter this in the JavaScript console:
switchServer ()
Same process happens but you're transferred back to the default server.
Public vs private
All new files are created private.
When you create a public link for a file, it becomes public. Other people have to be able to read it. This is what it means to be public.
Once a file is public it stays public forever. You can however delete the contents of the file. So you have a public file that's empty.